 American Meteor Society
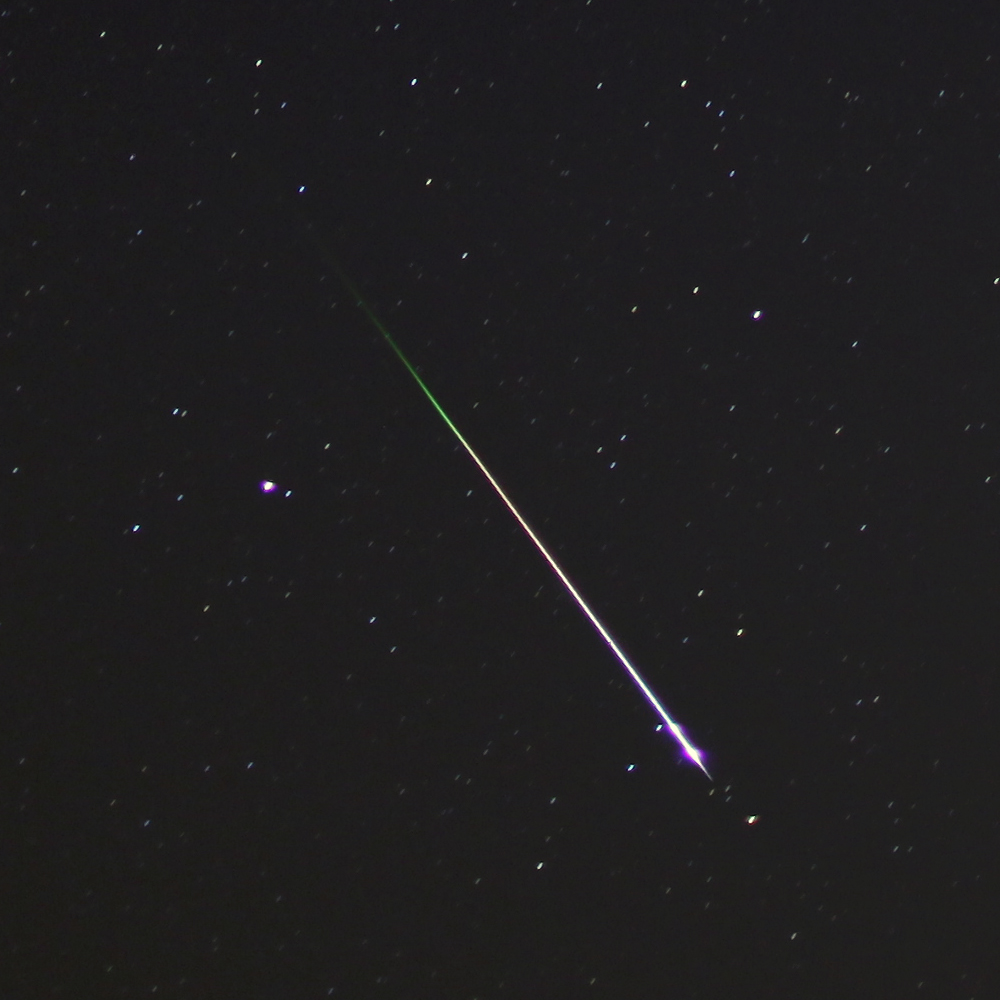
Leonid 2012 by Mike Hankey
Nothing can replace the thrill or experience of witnessing a bright meteor, meteor outburst or fireball with your own two eyes while wrapped in a sleeping bag on a cold winter morning. These visual thrills are the benefits of meteor observing, and while that one fireball experience will make up for ten frostbitten toes, we cannot always afford the costs associated with visual observing which include time, missed sleep and sometimes physical suffering. Is it worth it to stay up all night in the freezing cold to see some flashes of light cross the sky? Of course it is. Is there an easier way to observe a meteor shower that requires less of an investment in time and energy? Yes there is.
With the advent of digital photography, taking pictures of meteors has become much easier and cheaper, and as a result, a new observing method and art form is taking shape. Digital meteor photography can supplement or replace visual or video observing sessions. The benefit of camera observing is simple — when you finish your session, hopefully you will have one or more meteor pictures that you can study and share. The picture will not only be a piece of science, but a piece of art.
One can certainly debate the pros and cons regarding the different meteor observing methods — which is most effective, accurate, fun or scientifically valuable. I believe the best observing method is tethered to the goals of the observer. If you are only concerned with hourly rates, then radio observing is probably the best approach. For those who desire the experience, nothing can top visual observing. Meteor scientists tend to favor all sky camera video and believe the ideal exposure time for a meteor is a fraction of a second. While it’s true a DSLR can miss low magnitude meteors, and it will not be able to gauge the meteor velocity (without modification), the DSLR will record the meteor location relative to other stars with a degree of precision much higher than an all sky camera.
People have been taking pictures of meteors for decades, but with the onset of digital cameras this task is now much easier and cheaper than ever before. As a spoiled astronomer raised in the electronic age, I can’t fathom how someone could have coped with film based astrophotography twenty or more years ago. The immediate feedback system of a digital camera and its ability to take hundreds or even thousands of pictures in a single night are critical to success with meteor photography. We never know the exact moment when a meteor will shoot across the sky, so, if we want to catch one on camera, we must photograph the sky all night long.
The cost of capable DSLR cameras, lenses and accessories has come down in recent years, and you can acquire all of the basic equipment needed for meteor photography for around $1000. Of course those with a taste for the high end could spend twice that on just a lens, but for the sake of this article we will keep it simple.
To take good photographs of a meteor shower, at a minimum you will need the following equipment:
- DSLR Camera
- Fast, wide angle camera lens
- Intervalometer
- Tripod
- Large capacity memory card (16 gigs or better)
- Extra Batteries, AC power supply, or DC power adapter & large battery
- Dew heater
- Small hand towel
A review or recommendation of cameras is out of scope for this article, but for photographing meteor showers, the important things to have on your camera are: 1) a manual mode setting where the exposure time, ISO and f-ratio can be set and 2) a port to plug in an Intervalometer. If your camera has these two things and can be mounted on a tripod, then you can use it for meteor photography.
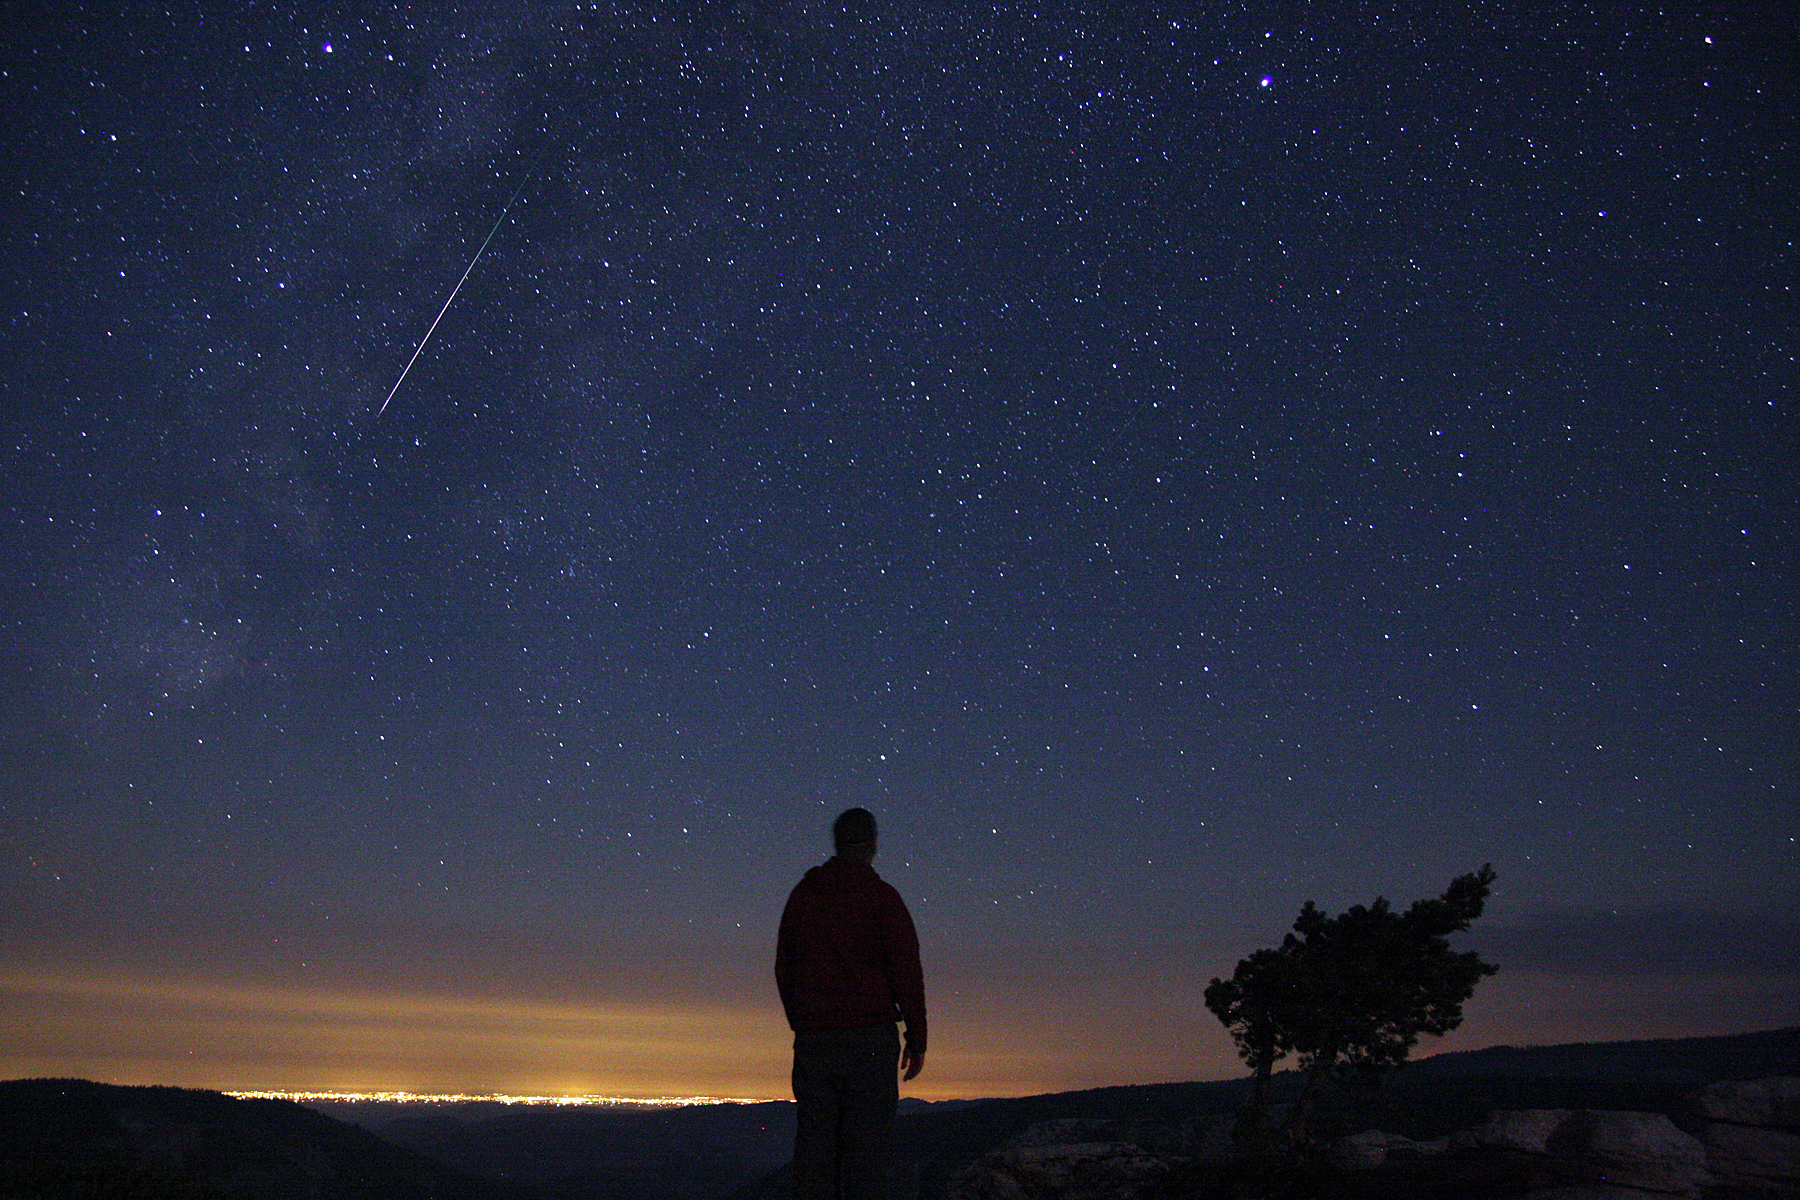
Mike Hankey with Perseid Meteor at Sentinel Dome, Yosemite National Park – August 12th, 2012
The camera lens is the single most important investment you can make in your meteor photography rig. There are two things about the lens that are most important — the f/ratio and the field of view (FOV). We will start with the FOV because it’s simple: the wider the field of view, the more sky you can capture and the more meteors you will catch per hour. Unfortunately, as you go wider you lose resolution because more sky is being placed into the same number of pixels, in effect making each object smaller. While many of us desire to image the entire sky, often a better quality picture can be taken with a smaller field of view.
The f/ratio or lens speed is usually written on the lens as a ratio (for example, f/2.8), and represents the focal length divided by the aperture. The f/ratio can be a difficult concept for new photographers, but what it means in meteor photography is this: with a faster lens you will capture fainter meteors. If the f/ratio is too high, you will miss most meteors. Ideally you want something in the < f/2.0 range. I have been successful with lenses up to f/2.8, but in my experience, once you go above f/3.0, your prospects of catching meteors rapidly diminish. There is nothing more frustrating than watching a meteor fly through your field of view only to check the camera and find out that the meteor was not imaged!
An intervalometer, also called a cable release, is a device that allows you to program and control the camera shutter without touching the camera. These devices can be programmed to take pictures in intervals using the camera’s ‘bulb’ setting and are often used for time lapse photography. There is also a button that, when locked in place, is equivalent to continuous shooting. The cable release controls your camera so you do not have to.
Power management and data storage are also considerations when photographing meteors. If you want to go all night long, a large capacity memory card and a few back up batteries are needed. A continuous or long term power supply is not required but nice to have, since most batteries will only give you about 2 hours of continuous shooting. There are two useful camera power adapters made for most cameras. Both mimic a battery and are inserted into the camera in the same way. A wire hangs out of the battery port and will plug into either an AC wall outlet or a DC car lighter style outlet, depending on which adapter you have. If you’re close to home, you can use the AC adapter and an extension cord to power your camera all night long. The DC adapter is commonly used with car-battery-type power supplies. Using this power adapter with a Celestron Power Tank, for example, will give your camera and dew heater enough juice for the entire night. I often use the AC adapter from my yard but rely on the DC adapter and power tank when shooting from a remote location.
If you want to photograph meteors all night long, you will need to be able to keep condensation off of your lens. Dew in the summer and frost in the winter can fog out your lens within the first hour of shooting. The most effective tool for preventing this is an astronomy dew heater designed for use with a telescope. An Internet search for ‘dew heater’ will reveal numerous tools that can do the job. Most are just a Velcro strap that you wrap around the camera lens. A wire run through the strap is heated by electricity and this keeps the lens warm enough to prevent condensation. Most dew heaters are powered by a DC power source, so a DC power camera adapter and the Celestron Power Tank compliment the dew heater nicely. Your camera and these 3 accessories (dew heater, DC adapter and tank battery) make a powerful astrophotography bundle that you can easily take anywhere.
Focusing is one of the most important steps, and your images should always be reviewed on a big computer screen before committing an entire night to the current settings. In general, to image the night’s sky, you must turn off auto focus and move the lens focus to the infinity position. This is often the last stop on the focus knob, but on some lenses perfect focus can be just short of this or just after it. I recommend using an A/B test procedure and the LCD lens at full zoom. For example, set the camera focus to infinity and take the first picture. Now bring the camera focus one step closer or further away from the infinity position and take the second picture. Find a star in the picture and zoom in as much as possible on that star. Switch back and forth between the two pictures to see which focus is better. Change focus directions when the focus starts to degrade. Do this above and below the infinity position until you find the perfect focus position for your lens. Finally, review the photo in your computer and make sure it looks good before shooting all night with this focus position.
When you are starting out with anything new, it’s important to experiment, test different methods and fine tune your procedures to find out what works best for your equipment and your night sky. I am still tweaking different aspects of my methods, settings and equipment and improving on the effectiveness and quality of my meteor photography. However, there is a core part of the procedure that remains constant every night. Keeping it simple and having a documented routine greatly increases the chances of not making a dumb mistake and ruining a night’s worth of opportunity.
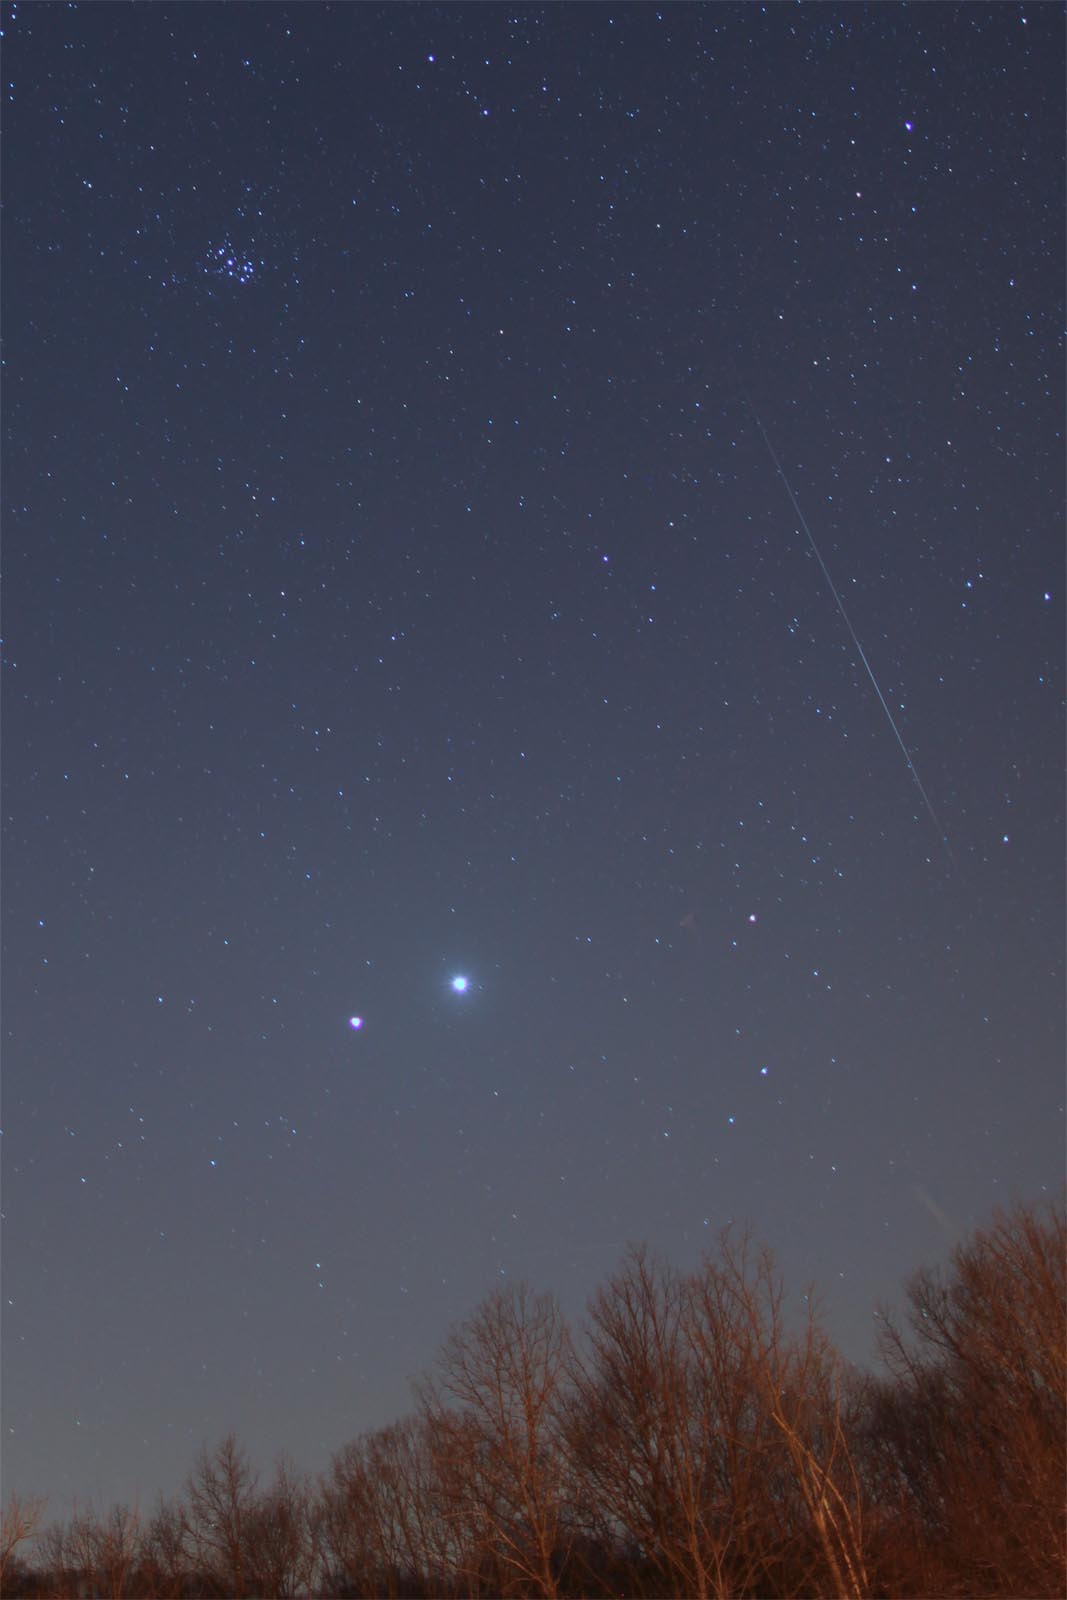
Meteor with Jupiter and Venus – March 14th, 2012 by Mike Hankey
Here is the procedure that I follow when setting up and executing a meteor photography run.
- Have a charged Celestron Power Tank handy.
- Check the weather and make rain plans if needed
- Check memory card for available storage; clear off if needed
- Verify time on camera is correct
- Verify file save settings are medium JPG and RAW
- Install DC power adapter into camera and plug into power tank
- Put memory card into camera
- Wrap dew heater around lens without blocking or touching focus knob (if possible)
- Mount camera on tripod
- As one unit move the tripod, camera and battery to the shooting location
- Set camera settings for ISO to 400-800 depending on conditions
- Set f/ratio to lowest possible setting considering light pollution
- Set camera exposure time considering light pollution, usually between 10-25 seconds.
- Frame the shot
- Focus the camera using focus procedure
- Review picture focus quality on camera LCD
- Tweak shot, camera settings and focus until acceptable
- Review picture focus and settings quality on computer for final time
- Start shooting by locking the cable release button in place
- Wrap camera with hand towel to prevent dew from getting on camera
- Check in within first hour of shooting and a few times through the night.
- Set alarm to retrieve camera at dawn and then go to bed.
If everything is working right, and you are located in a safe, crime free area, you can go to bed after the first check in, and the camera should operate all night long. Things that can potentially go wrong and ruin your imaging session include: filling up your memory card early, running out of power, having your lens fog up or frost over, shooting out of focus, or taking pictures with the wrong combination of ISO, f/ratio and exposure time. Documenting and following the same procedure every time will help guarantee success on most of your image runs. It could rain, or your camera could be stolen or knocked over by the wind, so plan accordingly. You should also make plans to retrieve the camera at dawn, as taking long exposures of sunlight puts unnecessary strain on your camera’s CCD chip.
In the morning you will have a potential treasure trove of meteor photos waiting for you. Finding a few meteor gems in an ocean of 500 or more pictures can be time consuming if you don’t have a good review process. Of critical importance to the review procedure is having a low res version of the pictures so you can quickly scan through them on your computer. I recommend saving the images in two formats; RAW will preserve the image in the highest quality possible, and a medium or low resolution JPEG will allow you to preview the image without having to wait for your computer to load and render it (something that can take a few seconds with high res images).
When I review the images I open just the JPGs in an image viewing program. I then press the cursor key to advance the image and I keep it pressed in. This creates a movie type of effect with a frame rate of about 1-2 frames per second. I then quickly scan the entire image looking for irregular differences or flashes and stop when I see them. I have to weed out plane and satellite trails but eventually am left with a few good meteor photos. Each time I find a photo containing a meteor I rename the file by adding the prefix ‘meteor’ to the file name. This will keep the picture out of the batch the next time I do my review. I will usually do this review at least two or three times and sometimes more depending on the field of view. During some showers, like the Geminids, when using a wide angle fisheye lens, I may review the lot five or more times and continue to find meteor photos after each pass.
Once I’m confident I have found and renamed all of the meteor photos, I create a directory on the memory card named after the date and shower name and move the meteor photos into that directory. I will then delete the rest of the photos on the memory card and free up the space by emptying the trash or recycle bin. Keeping an entire night’s worth of high res photos takes up lots of gigs of space and is a waste of time and resources to copy to your hard drive. That’s why I perform the review and file separation on the card the day after the imaging session. I then only copy over the meteor photos to my computer, instead of the entire night’s images.
Now that you have some nice single image meteor photos, what do you do with them? For starters, If you have an AMS account or use Facebook go to the AMSMeteors.org website under the menu Photos & Videos /Photos you will find an “Upload a Photo” button and share your photos there. In addition there are numerous outlets where you can publish your meteor pictures, including: The Meteor Observers Mailing List, Space.com, Facebook, Cloudy Nights and other astronomy websites. During a meteor shower there is usually a lot of interest from the media and local news websites, and blogs will often gladly publish your meteor photos. I have even seen some meteor photos get published on national news websites.
From a plotting perspective, a DSLR will record a meteor location with a level of precision much higher than some other recording devices such as a single fish-eye all-sky camera or single radiometer. This is because thousands of stars are captured in a long DSLR exposure with a fast lens compared to the dozen or so stars caught by a video camera with a slower lens. The larger image size and higher resolution picture also makes precise plotting much more reliable. While an all-sky fish-eye video camera will gather more scientific data, especially the meteor velocity and light curve, the lack of resolution and star detail in an all-sky system are shortcomings. For these reasons, I believe the perfect all sky solution would use both a fish-eye video camera and a DSLR with a fast full sky lens attached. This combination would allow the elevation and azimuth angles associated with a fireball to be determined with a much greater level of accuracy. A DSLR could also be used with a multi-camera all- sky array as a special radiant direction monitor during showers.
In the previous descriptions, it has been assumed that a whole series of single “time-lapse” exposures were made and individually saved such that it was always clear that the camera settings including ASA, f-ratio, exposure time and clock timings would be identical for a whole night’s run of images. As such, subsequent scientific use of the images and rigorous data reduction procedures are quite well-known and applicable without resorting to elaborate proprietary schemes.
One such method consists of “stacking” the individual images obtained sequentially by a stationary (relative to the ground). In such stacks, particularly when only frames that have a visible meteor on each are superposed, the stars (and/or planets) will not be trailed but rather appear as a series of dots. It is relative easy figuring which stars go with which meteors so that both meteor brightness and sky relative begin and end points may be determined. Such edited stacks are a form of image processing that is particularly valuable during meteor showers, but in general they must be reduced by hand. Only when a rare “stationary” meteor occurs can a radiant be determined from one meteor. Otherwise it takes finding the convergent point using all the shower meteor trails recorded to get a radiant position. Meteors that miss the radiant area by 10s of degrees are sporadic meteors.
Even if you can’t determine magnitudes and positions rigorously, scientifically you can determine the meteor frequency as determined by your camera and tally the meteor counts in the same way you would in a visual session. While these counts may be less than those of visual observers (because the faintest meteors aren’t always caught), a frequency count of DSLR meteors would be interesting to track over the course of a meteor shower or from year to year as a special project. Here is an example of such a stack that is useful as well as ornamental provided full technical details are given. If the stack is made by superposing all of the images whether or not they contain a meteor then such data are conveniently indicated in the form 24x300s from which a total exposure of 2 hours can be calculated. Otherwise the total span of the exposure as indicated as the start (first meteor image) and stop times (last meteor image) should be given.

Composite Image of Perseid Meteor Shower – August 12th, 2012
One would think that DSLRs should have evolved into the perfect meteor system. Over the last decade, however, DSLR camera designs have been extensively modified in response to the demands of professional photographers whose trade increasingly requires drastic “retouching” of originals to satisfy customer preferences and demands. Included these days are features that can automatically modify a camera scene in such a way that the original information that may be of scientific (as opposed to artistic) value, can never be recovered. But even if your camera does not provide such on camera processing, dozens of “photoshop” clones are now available that will allow performing hundreds of artistic transformations (usually without a “paper trail”) to any image regardless of source. Such drastic “retouching” is called High Dynamic Range (HDR) image processing and as it can also be performed after taking a series of celestial exposures, HDR modified sky scenes have appeared without adequate documentation on the internet and even in recent popular astronomy magazines.
HDR is type of “image compression” but because it is always non-linear it means that there is no guarantee it is reversible without loss of information. This is made worse if original HDR files are converted to other formats for transmission over the internet. Other known types of lossy compression whether or not they contain HDR modified images include JPEG and GIF. ( https://en.wikipedia.org/wiki/Image_file_formats ) Most HDR “originals” are recorded in the cameras as “raw” format. Common image file formats that can include original HDR images (16 or 32 bit) from which the “original” image information “might” be extractable will have “HDR” attached to the suffix. ( https://en.wikipedia.org/wiki/High_dynamic_range_imaging) If there is no HDR notation attached, it must be assumed that the file has been converted in a non-recoverable way.
So if you are submitting HDR or even custom “stacked” exposures to the AMS or other scientific organizations you should be honest and disclose such processing details when your image is submitted. There are scientific instances when such images are appropriately used with little notice of processing methodology, i.e. NASA spacecraft images where the applied image processing has been standardized with widely publicized details and software distributions that are publicly available and for which full details do not have to be repeated for each image. If the image submission process does not allow posting of sufficient processing details with your images then send an e-mail to the listed person responsible for the use of your image. Your thoughtfulness will be truly appreciated.